Slicing
Ipyvolume has no special support for slicing 3d volumes, but has the options to support this. To understand how to do this, we will create a 3d plot, with a plane, which will be controlled using the mouse, and later on texture map this with the same data as the volumetric data.
Simple guassian blob
Lets start with a simple scatter plot.
[1]:
import ipyvolume as ipv
fig = ipv.figure()
scatter = ipv.examples.gaussian(show=False)
ipv.show()
Now, we add a plane at z=0.
[2]:
plane = ipv.plot_plane("z");
By holding the shift key and hovering the mouse at the edges of the bounding box (or activate slice mode in the toolbar, and click), we modify the slice_z property. By linking the slice_z property to the z_offset property of the mesh/plane, we can interactively move the plane. Note that in order to change the z_offset, you need to hover the mouse at the sides of the bounding box, which means you need to make sides of the bounding box visible.
[3]:
import ipywidgets as widgets
widgets.jslink((fig, 'slice_z'), (plane, 'z_offset'));
Adding a texture
This plane can be texture mapped with additional information, for instance, a heatmap. We use vaex with maplotlib to create a simple 2d heatmap PIL Image.
[4]:
## Uncomment to try
# import vaex
# import matplotlib.pylab as plt
# import PIL.Image
# df = vaex.from_arrays(x=scatter.x, y=scatter.y)
# fig2d = plt.figure()
# ax = fig2d.add_axes([0, 0, 1, 1])
# df.viz.heatmap(df.x, df.y, shape=64, show=False, colorbar=False, tight_layout=False)
# fig2d.axes[0].axis('off');
# plt.draw()
# image = PIL.Image.frombytes('RGB', fig2d.canvas.get_width_height(), fig2d.canvas.tostring_rgb())
# plt.close()
# image
On just download an image:
[5]:
# example how put a png as texture
import PIL.Image
import requests
import io
url = 'https://vaex.io/img/logos/spiral-small.png'
r = requests.get(url, stream=True)
f = io.BytesIO(r.content)
image = PIL.Image.open(f)
And assign it to the plane’s texture. Note that we should also set its u and v coordinates, so we know where the edges of the texture map should go:
[6]:
plane.u = [0.0, 1.0, 1.0, 0.0]
plane.v = [0.0, 0.0, 1.0, 1.0]
plane.texture = image
[ ]:
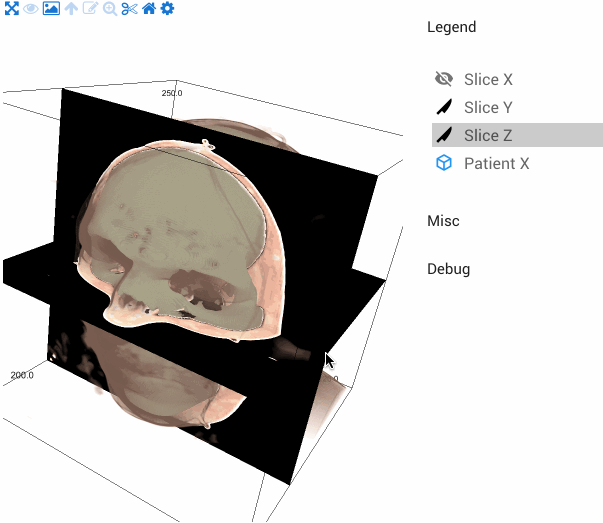
Slicing a volume
We can also, texture map a mesh (a plane is a mesh) with a 3d texture, from the volumetric data.
[7]:
import ipyvolume as ipv
fig = ipv.figure()
volume = ipv.examples.head(show=False, description="Patient X")
ipv.show()
Downloading https://github.com/maartenbreddels/ipyvolume/raw/master/datasets/male.raw.bz2 to /home/docs/.ipyvolume/datasets/male.raw.bz2
--2021-11-01 12:38:53-- https://github.com/maartenbreddels/ipyvolume/raw/master/datasets/male.raw.bz2
Resolving github.com (github.com)... 140.82.114.3
Connecting to github.com (github.com)|140.82.114.3|:443... connected.
HTTP request sent, awaiting response... 302 Found
Location: https://raw.githubusercontent.com/maartenbreddels/ipyvolume/master/datasets/male.raw.bz2 [following]
--2021-11-01 12:38:53-- https://raw.githubusercontent.com/maartenbreddels/ipyvolume/master/datasets/male.raw.bz2
Resolving raw.githubusercontent.com (raw.githubusercontent.com)... 185.199.109.133, 185.199.108.133, 185.199.111.133, ...
Connecting to raw.githubusercontent.com (raw.githubusercontent.com)|185.199.109.133|:443... connected.
HTTP request sent, awaiting response... 200 OK
Length: 2305035 (2.2M) [application/octet-stream]
Saving to: ‘/home/docs/.ipyvolume/datasets/male.raw.bz2’
male.raw.bz2 100%[===================>] 2.20M --.-KB/s in 0.08s
2021-11-01 12:38:53 (29.3 MB/s) - ‘/home/docs/.ipyvolume/datasets/male.raw.bz2’ saved [2305035/2305035]
We now add 3 planes, and pass our volume so it can be used as a texture map.
[8]:
slice_x = ipv.plot_plane('x', volume=volume, description="Slice X", description_color="black", icon="mdi-knife")
slice_y = ipv.plot_plane('y', volume=volume, description="Slice Y", description_color="black", icon="mdi-knife")
slice_z = ipv.plot_plane('z', volume=volume, description="Slice Z", description_color="black", icon="mdi-knife",
visible=False)
Again, by connecting the slice coordinates to the offsets of the planes, we can create 3 slicing planes that can be controlled interactively.
[9]:
import ipywidgets as widgets
widgets.jslink((fig, 'slice_x'), (slice_x, 'x_offset'))
widgets.jslink((fig, 'slice_y'), (slice_y, 'y_offset'))
widgets.jslink((fig, 'slice_z'), (slice_z, 'z_offset'));
Note that you can save the output to an html file, and the slicing will still work without a connected kernel.
[10]:
# uncomment to save
ipv.save("slice.html", devmode=True)
[ ]: